10 Tips for Low-Light Cocktail Photography, from PDT and Manhattan Cocktail Classic

One of the biggest headaches when photographing food and drinks is the amount of lighting available. When I first started working on food-related freelance assignments a few years ago, editors would sometimes ask for photos to go along with the article. Unfortunately, I was such a novice with my DSLR that the photos I took on location (whether it was a cafe, bar, restaurant, or greenhouse) came out too dark for the photo editor to use. Sometimes they sent a *real* photographer out; other times, when the budget was too tight, they made do with PR promo photos instead.
Over the years my on-location shots got a tad better, but never as good as shooting recipe experiments at home, where it's much easier to get natural lighting by the window or get faux bright lighting with a small photo tent.
And so, thank you Manhattan Cocktail Classic, for organizing this cocktail photography workshop and recognizing that there is a need for food and cocktail geeks to acquire skills for taking nice and discreet shots in low lighting. The key word is discreet. After all, the main purpose of going out to eat and drink is enjoying what you are eating and drinking, not getting assaulted with flashes or shutter sounds while someone next to you is overdocumenting their experience.
And of course, low-light techniques be as useful in noodle shops, banh mi stands, and dim sum parlors as in bars.

The workshop was held at the hip and lovely PDT in the East Village. Seriously, if you can take a decent shot at PDT, where the only lighting sources are votive candles or small overhead lights for the taxidermy, you can take a decent shot anywhere.
Elba S. Giron and Angel Arroyo from We Shoot Cocktails led one group in working with studio set-ups for cocktails, while Leo Borovskiy from Lush Life Productions spoke about photographing on location. (And by the way, the Vesper cocktail made by bartender John deBary was pretty groovy. So was the Old Fashioned, which, even though the whiskey was just Jameson, somehow tasted better than every other Old Fashioned out there.)

Based on everyone's advice, here are 10 tips for photographing drinks in low lighting. Many of these can be applied to other food-centric environments:
1. You don't need a DSLR to get great shots at a bar - Some of the best photos in the group were taken with point-and-shoot cameras and even iPhones. What matters more is how steady the camera is held. Which brings us to...
2. Get a Gorillapod or another mini tripod - They cost between $15 to $45 and fit inside any purse or decent-sized camera bag. This way, you can set your exposure for longer and not worry about any hand vibration (especially when drinking at the same time.) They're also great for shooting at a low angle, if you want a more atmospheric background than just the tabletop. My shots on Sunday would probably have come out 5x better with a Gorillapod.
3. The tripod doesn't always have to be right-side-up - To get a shot of the entire room, one good method is to steady your tripod against the wall and then use your arm strength to push the tripod against the wall, while snapping the shot. This way, you don't put any weight on the camera itself and cause it to move.
4. In absence of tripods, make use of stable objects - Tables are best for steadying your camera on. Martini glasses won't work, but and old fashioned glass might, in a pinch.
5.Exhale - According to Leo Borovskiy, if you press the shutter after a deep exhale, your hands do not move as much.
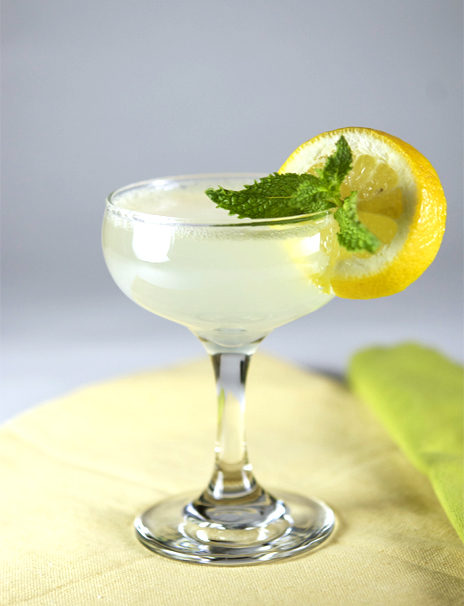
6. Experiment with available lighting - Use candles and overhead lamps, and even sit at the bar if the lighting is better. With clear drinks, try placing the candle to the side, so light bounces off the liquid. With milky or fizzy drinks, place the candle behind the glass to highlight bubbles the texture.
7. Don't worry that much about white balance - Lighting in bars is tricky enough, and you don't need to spend 15 minutes just adjusting the white balance while the ice in your drink melts. You can always do a quick white balance pre-set, but if you have a point-and-shoot or if your camera refuses to measure in dim lighting (like my Nikon D40), just pick the closest setting (I chose Incandescent.) If you can, shoot in raw and fix the white balance later in Photoshop or Lightroom.
8. Don't use the highest ISO setting - It's tempting to use the highest ISO in extreme low light, but the higher you bump up the ISO up, the grainier the shot will get. Instead, choose a lower ISO (200 to 800, depending on your camera) and open your lens wider.
9. Shoot in aperture mode - It's the fastest way to get a good shot; going manual and trying to meter in dim lighting will just take up more time. I opened my lens to f/3.0 and let my camera find its comfortable shutter speed. To capture more of the action in the background, go for a smaller aperture if your camera can handle it in dim lighting.
10. Use discretion - When shooting at a bar, plan your shots in your head beforehand. Maybe even let the bartender know you're photographing. Take only a few shots so that you can enjoy your drink and let everyone else enjoy theirs.
The folks from We Shoot Cocktails also took over a small area in the back of PDT to show us a simple studio set-up using scoop lights and white posterboard:
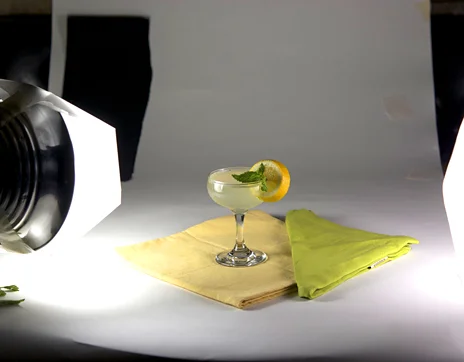
So much easier! But then, the bright lighting doesn't quite capture the atmosphere of a modern-day speakeasy.
____________________________
More beyond-the-basics photography tips:
How to: DIY $10 Macro Photo Studio - from Strobist
Video: Food Photography w/ On Camera Speedlight - from White on Rice Couple
Lowel EGO Lights for Food Photography - from Steamy Kitchen
Food Props on Sunday - 1st Installment - from Lucullian
Food Props on Sunday - 2nd Installment - from Lucullian
____________________________
More cocktail posts: